How To Sharpen An Image In Gimp

How To Sharpen An Image In Gimp

Are you searching for a photoshop alternative to sharpen your image? Well, gimp can be the perfect photoshop alternative to edit images but the question is how to sharpen an image in gimp.

In today’s image editing tutorial we will be learning how easily you can sharpen your image in gimp. To be able to do it you don’t have to be a pro in gimp just know the basics and you are good to go.

We will use a beautiful bird image for this tutorial but you can use any of your images that require sharpness.

Let’s get started…

I will go through step by step and explain every step in detail to make the tutorial more understandable and doable for everyone. 

Go through the steps one by one and follow the instructions accurately to get the best result. 

Pro Tip: Use the latest version of GIMP to get access to the latest tools and settings which will make things easier to handle.

Step 1: Insert The Image

Step 1 Insert The Image

Open the gimp software and insert your image to start editing. To insert an image in gimp go to File→ Open or press and hold the Ctrl button then click O. 

A pop up window will appear from where you will be able to navigate the directories and select the image you want to edit in gimp.

Now click on the open button to insert the image in gimp.

Step 2: Create Duplicate Layer

Step 2 Create Duplicate Layer

I would suggest you guys follow this step strictly. 

When we open our image in gimp the layer it created is the original layer. 

So if we start editing this layer our original file will get all the changes permanently and we won’t be able to retrieve the original file.

So creating a duplicate layer of the original layer is the solution that we must go for. 

To create a duplicate layer in gimp go to Layer→ Duplicate Layer or you can also use the shortcut Shift+Ctrl+D and your duplicate layer will be created. You can rename it if you want.

Step 3: Zoom In

Step 3 Zoom In

To sharpen our image accurately we have to zoom in and to do that we have to go to View and then select Zoom>1:1 (100%). 

Zooming the image will help us to see every detail and we will work according to it. As I am using a bird image I will zoom in around its head.

Step 4: Use Noise Reduction

Step 4 Use Noise Reduction

After zooming in we will see noise in our image which needs to remove before sharpening it. To remove noise from the image go to Filter→ Enhance→ Noise Reduction.

Removing noise is a big part of sharpening an image. Now we need to create 2 more duplicate layers for the next step. Create duplicate layers again by following step 2 like before.

Step 5: High Pass

Step 5 High Pass

Now we will use the high pass option to make our sharpness more effective on our image. Go to Filters→ Enhance and select the High Pass option. It will smoothen up the image a little bit to enhance the fine detail.

Step 6: Use Vivid Light

Step 6 Use Vivid Light

Next up we will use the vivid light option to capture more light and detail into our image. Find the option in the mode section and turn the Normal to Vivid Light.

Step 7: Apply the Unsharp Mask filter

Step 7 Apply the Unsharp Mask filter

With the zooming we have completed the preparation and now it’s time for us to sharpen our image.

First we will select the duplicate layer we have created and then we will go to Filters > Enhance > Sharpen (Unsharp Mask)

A pop up window for an unsharp mask will appear from where we will be able to control the sharpness of our image. In the window we will see three settings which are Radius, Amount and Threshold.

These three options do their own set of work for sharpening an image. Radius ensures pixel numbers when we sharpen our image. So you can adjust how many pixels you need by writing the amount in the radius box.

On the other hand, the Amount option lets you control the strength of your sharpening. So you can decide how sharp you want to make your image.

Lastly, the Threshold option indicates the difference in pixel values and where the sharpening must be applied.

If you accidentally mess up any of the settings then you can undo it and try again to aim for perfection. It is hard to get the numbers perfect and that’s why you have to play with the settings until you learn and get the best fit. 

When you are satisfied with your settings click OK.

Step 8: Save Your File

Step 8 Save Your File

When we are done, go to File→ Save or press Ctrl+S to and a window will pop up where you can give a name to your file and navigate where you want to save it.

When you are done, hit on Save button and save it with the “.xcf” extension. It is the native format of GIMP and if you save your file in this format then it will store all your changes and later you can insert it and get them back just as you left.

You can save a version of your done file at the traditional image file formats such as jpeg to use on the digital platform.

The Bottom Line

Gimp is an open source image editing software that might not replace photoshop but we can use it to edit our images here and there.

You can do the basic but primary image editing using GIMP.

Our today’s tutorial contains one of the basic photo edits which is sharpening a blurry image. 

Sharpening a photo is relatively easier in gimp than photoshop and you don’t need to be a pro to be able to do that either.

So if you are one of them who doesn’t know how to sharpen an image in gimp then this article would be a great treat for you today.

Bordie Capron

Bordie Capron

Author

“Bordie Capron is a Sr. Content Maker who is working in The Clipping Path Service an US-based image and video post-production company for over 7+ years. She completed her degree in graphic designing and worked as a graphic designing expert for several years. She always loved writing”

5 Comments

Ted
May 24, 2022 9:51 am

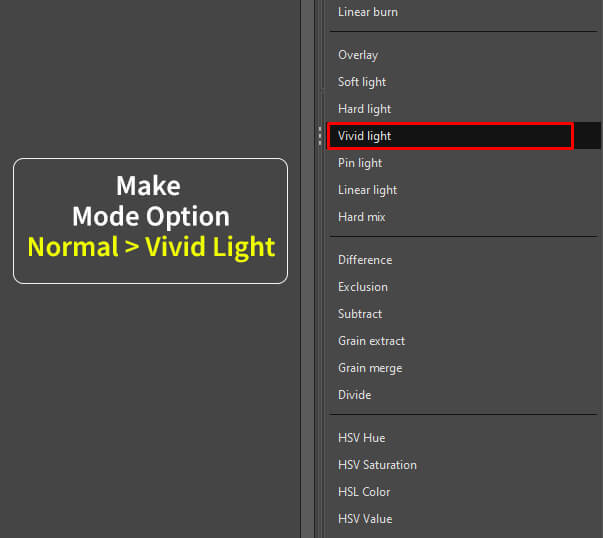
Stopped at step 6, can’t find “mode section” or “vivid light”

Bordie Capron
May 30, 2022 9:31 am

Look at your software sidebar panel, and you will find the “Mode” Option, By Clicking on it you will find your vivid light option.

Klaus
March 17, 2023 6:13 pm

Sorry for asking, but I don’t get it. We add duplicate layers on top of the original image. But the duplicate layers all look different (the ones with High Pass and Vivid Light), but in the end we just put another duplicate layer on top and none of the others can be seen anymore. Do we need to make them transparent in a way? The new layers on top just cover the entire previous layer, so how do we combine them into one image with all of the layers putting their information into the result?

Bordie
March 18, 2023 4:59 am

Maybe you are using a different version, We are using 2.20.24

Tariq Altaie
September 5, 2023 11:11 pm

The article is fantastic, but its author is even more amazing. I sincerely thank you from the heart, as I gained a lot from it.

Leave a Reply

Quick Response

Email:
cs@theclippingpathservice.com

Hotline Support:
Mobile:       +1 (718) 717-2362