How-to-fix-grainy-photos

How to Fix Grainy Photos | 3 Ways to Reduce Noise from Photos

A grainy and blurry image can ruin all our special memories. Before we go to the tutorial to fix grainy photos we need to identify the reason behind it. There are many reasons behind a grainy image. Photography lighting is one of the main reasons. By working on a few photography lighting techniques, we can solve this issue but you have to use the best camera for professional photography also. 

Buying professional photography cameras isn’t always necessary if you do not belong to a professional or commercial photographer community. Today smartphone cameras are so enhanced that some of them can compete with mid-range professional cameras also without any doubt.

Not all of us belong to that community and we don’t have a DSLR camera. Other than using professional cameras and lighting, to fix grainy photos we only have the post-processing section. Today our main focus will be, how to fix dark grainy photos in Photoshop

Capturing a grainy and noisy image is not intentional and it has more reasons other than using professional photography cameras. Let’s talk more elaborately about the reasons.

Gold was used to cover the plastic film back in the era of analog photography to make it light-sensitive. The silver bits will absorb the sun. The smallest pieces of silver were in ISO 100 and the higher levels, such as 3200, were much bigger. It includes photographing in low-light areas. 

When the sensor of your camera is needed to increase the light available to show an image, noise or grain in a picture appears. You can decrease present noise by adjusting how your camera takes this image. The grain is another term for noise, even if it sometimes applies to film grain. Nevertheless, grain and noise are often omitted in Photoshop.

A very high ISO is a common cause of grain in an image. There are many alternate options for using higher ISOs but a good way to reduce all grains is to keep the ISO as low as possible.

Why Are My Photos Grainy?

As we all are not in the profession of photography, shooting photos in a studio lighting setup to get noiseless photos aren’t possible every time. We capture images everywhere and getting the perfect lighting everywhere is impossible, right? We click pictures day and night simultaneously to capture our special memories of everything. 

Images captured in daylight get less grainy and noisy than the images captured at night. There are many reasons behind grainy photos

Lack of Photography Lighting Techniques

Lighting is the main issue in capturing grainy and noisy images. The pictures turn grainy in the absence of sufficient light. The professional photographers or agencies have a studio lighting setup. Because of that, we found professional model photos so flawless and appealing.

Too small sensor

The smaller the CCD or CMOS sensor of your camera, the noisier your picture is. A larger sensor includes millions of light-sensitive spots to capture and record data from a noise-free lens. Smartphones and SLR or digital cameras always contain small sensors.

ISO settings

In photography, there is a simple rule which is the higher you take your ISO the more grain you get. But in low light, we must increase the ISO by a huge margin to get a more clear image but with a clear image, you will get grain and noise also. It is you to decide, how much ISO need to avoid noise in the image

Camera Type

Camera is also a reason for the grainy image. If you have a budget-friendly camera then you must know that there are some compromises that are made to make the camera budget-friendly. If you have a pro-level camera and still you are getting an intensive noisy image then your camera has technical issues.

How to Avoid Grainy Photos?

Prevention is better than cure. So we can avoid doing things or take some precautions to prevent the grainy effect on our images. As we have already discussed the effect of ISO in photography, finding a suitable spot of ISO that suits your photography can largely prevent your photos from being grainy or noisy is very important. 

Lower ISO levels, like 100 or 200, produce the minimum grain or noise, whereas ISO of 3200 levels or higher produces large quantities of grain. We recommend that you keep your ISO as close as possible to 100. There will be times when you find yourself taking pictures in very low light conditions, where ISO 100/200 is not going to cut that off.

ISO settings Explained

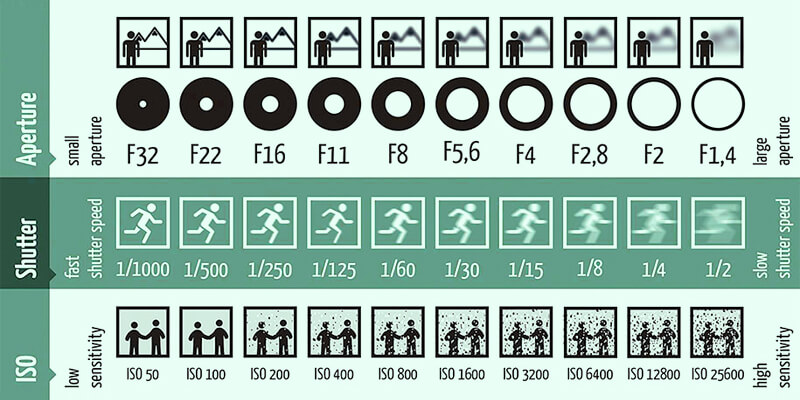
In this situation, try to adjust your aperture and then shutter speed (up to 1/60 without a tripod/wall) to keep your ISO low. Try to boost your light using photography lighting kits. Push your camera to calculate on the lighter image regions, it won’t over-extend the image to capture darker areas. 

A strobe or flash unit is very effective when boosting lights and in event photography, it is a must-have photography kit. In other instances, such as portraits and studio photography, the reflector may contribute to reducing the darker areas. Many circumstances will not require you to use a light, like photography for concerts. Use the available lighting and use the surrounding area as much as possible. A tripod will help you reduce your shutter speed, which makes your ISO low. 

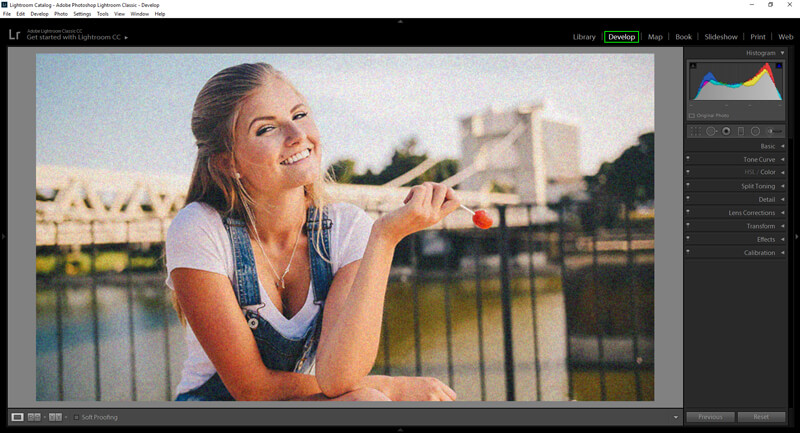
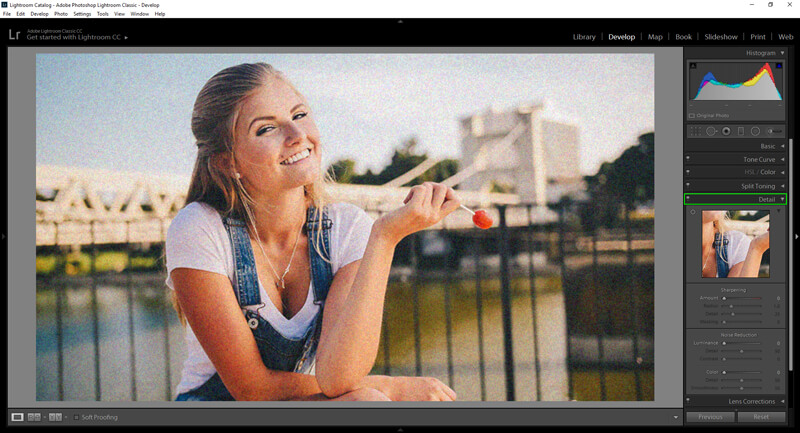
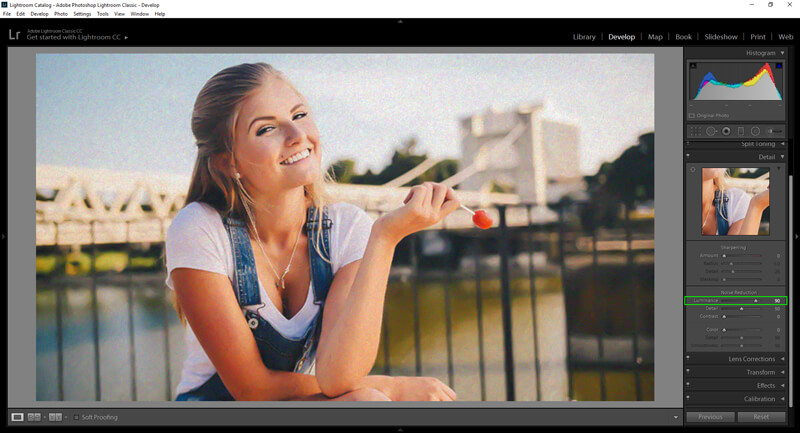
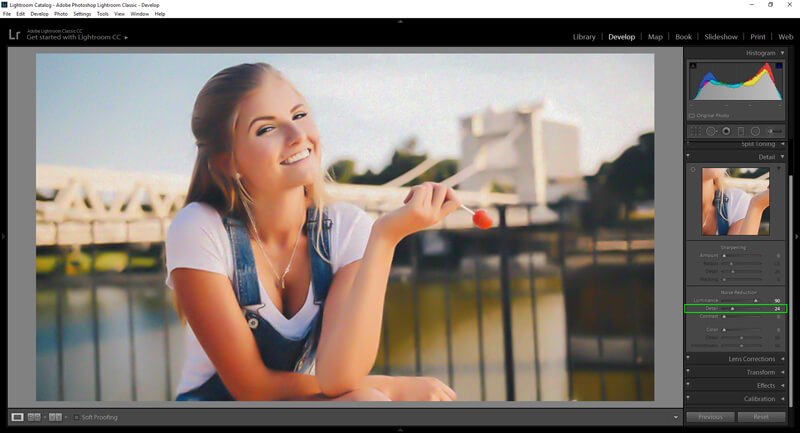
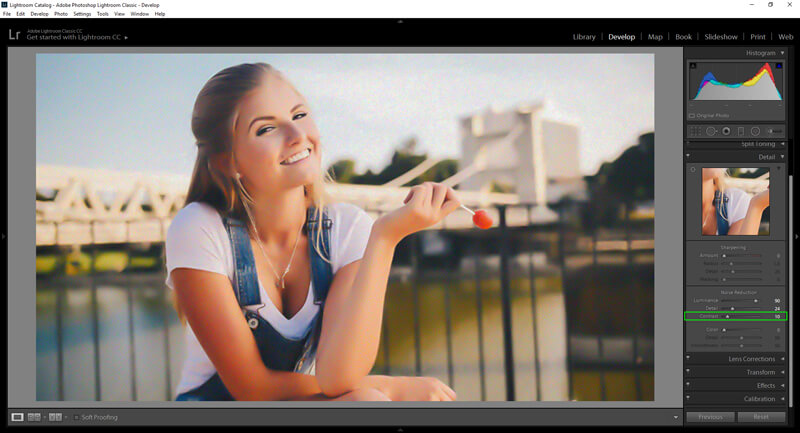
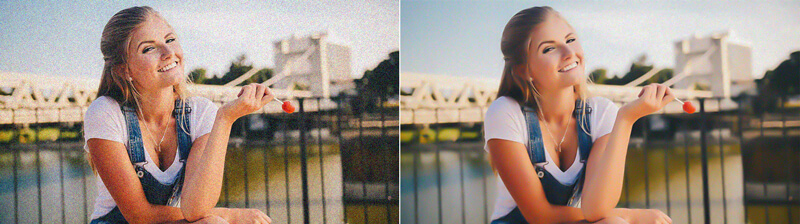
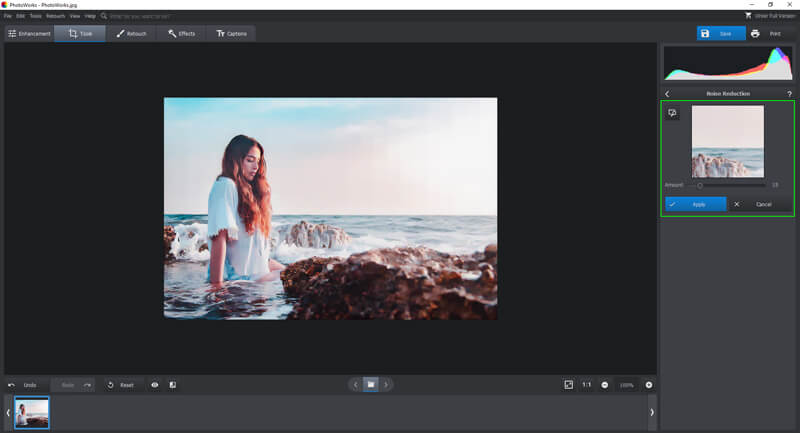
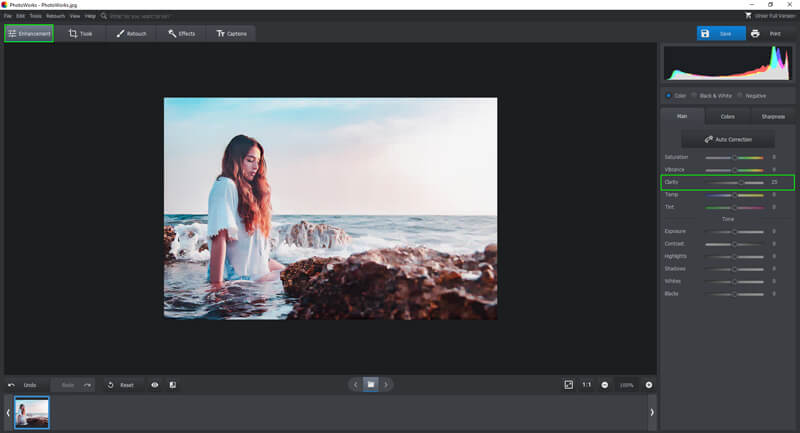
What if you can’t have the best photography kits to avoid the grain in your image? What if you have all the photography kits but still notice grain while shooting in the extreme situation? Image post-processing is the only way to make a picture less grainy. There are many ways to fix grainy or noisy photos. 

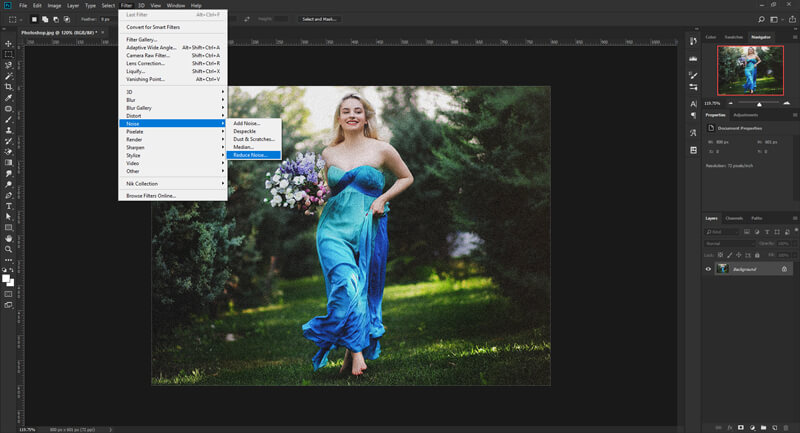
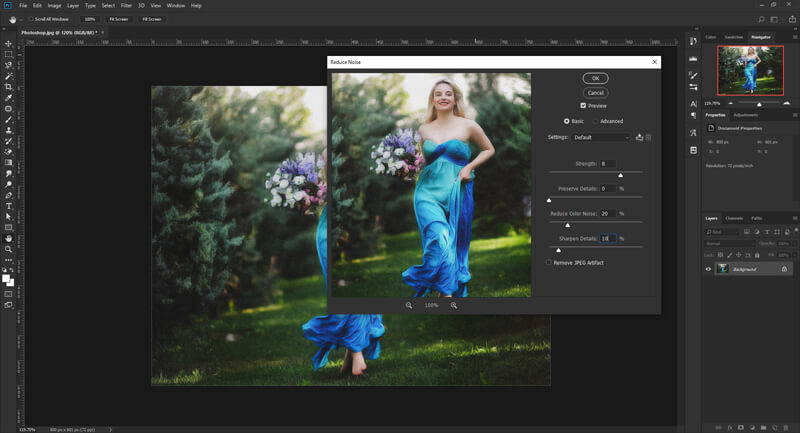
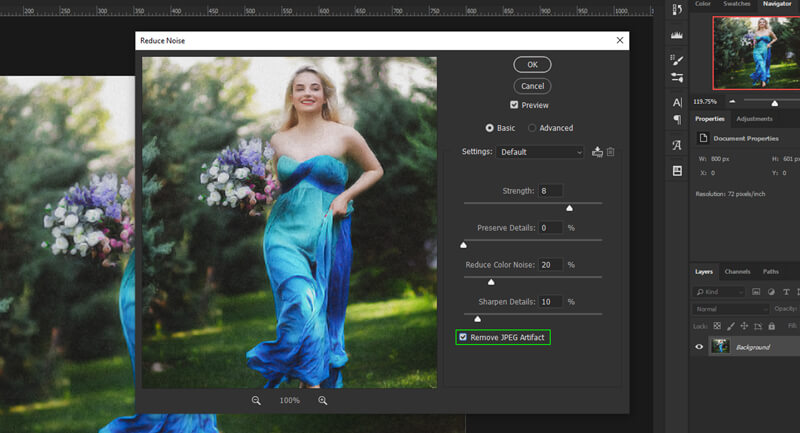
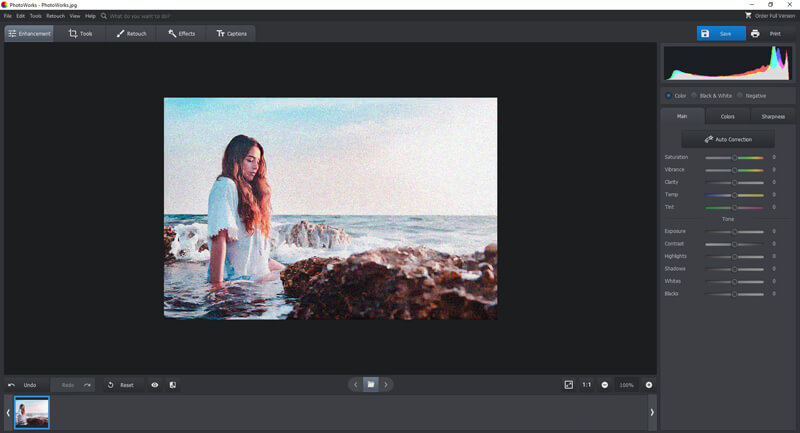
Though the most professional image editing software, Adobe Photoshop is the ultimate choice for this process but there are also some image editing tools and software that you can use to fix your grainy photos. So let’s know the answer to,  how to fix grainy photos?

How to Fix Grainy Photos in Photoshop?

For all Image post-processing, Adobe Photoshop is the ultimate solution. This software has a special noise reduction filter. So let’s know, how to fix dark grainy photos in Photoshop?

That’s the photo that we’ll use to fix grain and noise. The grain is very distracting, as you can see, and it hurts the image quality.

Fix Grainy Photos in Photoshop

So to remove all the grain from the image we have to insert the image in Photoshop software.

Step 1: After inserting the image to Filter. Then go to Noise and select Reduce Noise.

go to Noise and select Reduce Noise

You will get a pop-up window containing options like Strength, Preserve Details, Reduce Color Noise and Sharpen Details.

Reduce Color Noise and Sharpen Details

Step 2: Change the three sliders( Strength, Reduce Color Noise, and Sharpen Details ) according to your needs.

Change the three sliders

For my image, I changed those setting

  • Strength: 8
  • Reduce Color Noise: 20%
  • Sharpen Details: 10%
Strength 8 Reduce Color Noise 20% Sharpen Details 10%

Now see the final outcome for my image. To see the preview just select the Remove JPEG Artifact

Remove JPEG Artifact

Here is the before-after view to see the result more clearly.

How to Fix Grainy Photos in Lightroom?

Lightroom is also a product of adobe Photoshop. It is also a great addition to use for image post-processing and it is also a great tool for image denoising. It has a dedicated panel to increase and decrease the detail of the image.  This is a part of the picture we’re going to use. As you can see, the grain distracts significantly and decreases the image quality.
Insert your image to the lightroom

Step 1: Insert your image to the lightroom software and click on the Develop module.

go to the Noise Reduction area

Step 2: Go to the Detail right hand down section and go to the Noise Reduction area.

go to the Noise Reduction area

Step 3: In the Noise Reduction area you will see three options which are Luminance, Detail, and Contrast.

Luminance, Detail, and Contrast

At first change the slider of Luminance according to your needs and see in the preview the changes happen to your image.

change the slider of Luminance

Step 4: After that low down the slider of Detail to get a smoother look in your image.

slider of Detail to get a smoother look in your image

Step 5: Change the Contrast according to your needs.

Change the Contrast according to your needs

Every image is different, so you can find the best way to minimize noise when played with various degrees of this slider. Here is the final output.

Before-After

The grain and noise elimination can be seen here before and after. The photo is still not free of grain, but definitely less prominent. That’s good, because it’s not a close-up for me and my face. Grain can not be totally eliminated with some concert photography images. In case of concert photography virtual noise can even give the image a feeling.

How to Fix Grainy Photos Without Photoshop?

So we have seen how to fix dark grainy photos in photoshop and lightroom but can you fix grainy photos without photoshop? The answer is yes and no. Yes you can fix your grainy and noisy images without using adobe photoshop by using other image editing software like photoshop.

So before starting the tutorial on, how to make a picture less grainy without photoshop? i would love to say that, here i will be showing an image editing tutorial of only one photo post processing software but you will find more than one photoshop alternate like GIMP. For this tutorial, I will be using photo works

PhotoWorks is a true pick-up to newbies who have no time and no ability to scan and puzzle complex charts in order to find the right tool.

Step 1: Open your desired image in the software. You can do it with a simple drag and drop method.

Step 2: In the Tools tab, you will find the Noise Reduction menu. Select it and you will get Noise Reduction Panel.

In the Tools tab, you will find the Noise Reduction menu photoworks

Step 3: The app zooms into a fragment of your image automatically so that you can see all the changes better. Increase or decrease the Amount slider to smooth your image.

Image-3 photoworks

Step 4: After reducing the grain you may find your image a little bit blurry, switch to the Enhancement tab and change the settings for Clarity.

final image photoworks

PhotoWorks is able to remove noise and gain in just three steps from your photos. Not only that, you can use it to resize images, retouch images and many more. It is a simple click and drag process which guarantees a desired result, so you don’t need to adjust multiple sliders or settings.

Final Verdict

With all these image editing processes, you can fix your grainy photos easily. The magic wand removes the grain or sound from the pictures at once with Photoshop or Lightroom. To get the acceptable image quality you need to experiment and smartly play with the settings. With its advanced algorithm, PhotoWorks for Photo produces more crisp, clean and vivid results.

To fix grainy photos you will find lots of different different ways but which one you use is up to you. I hope this article will help you to choose but if you want to get the best result, you have to practise.

Bordie Capron

Bordie Capron

Author

“Bordie Capron is a Sr. Content Maker who is working in The Clipping Path Service an US-based image and video post-production company for over 7+ years. She completed her degree in graphic designing and worked as a graphic designing expert for several years. She always loved writing”

2 Comments

Mitzi Jackson
April 26, 2020 6:38 am

This is awesome! Thank you so much for posting this article.

admin
May 1, 2020 9:18 am

Thanks for the feedback

Leave a Reply

Quick Response

Email:
cs@theclippingpathservice.com

Hotline Support:
Mobile:       +1 (718) 717-2362