Product-Photography-Setup

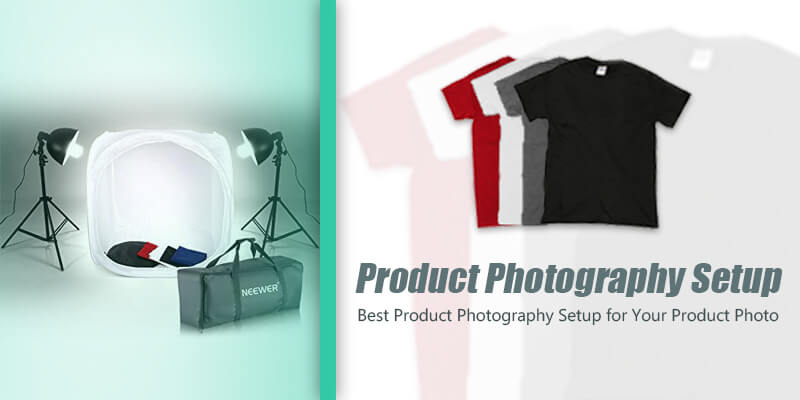
Product Photography Setup | A DIY Guide For Best Product Photo

A picture speaks a thousand words but it also generates money. Let’s see how? Customers are always seeking for time-saving shortcuts and their focus goes naturally towards collecting information the fastest way. Which is only possible with proper product photos. So product photography is more important for eCommerce stores than in other sectors. To get the best from your product photo, a well-known photography studio is needed with the necessary product photography setup.

60,000 visuals are processed more quickly than text in the brain.

According to the 3M corporation

Over 88% of UK and US consumers are doing shopping online nowadays. Among them, 95% of people purchase their products based on the visual looks aka product photo. They judge a product with its image because they do shopping by seeing the product image first. With only seeing the product photo they get an idea of whether the product is good or bad. Product images not only show your product quality but also used as doors in your e-commerce shop providing 2 important factors:

  • Transparency
  • Trust

Image presentation decides their initial impression and creates an indication of whether they are going to continue browsing and then buy. With a good product photography setup and professional product photography, you can make good quality product images to present it more desirable. 

If you are a beginner in the photography business and searching for a good way of starting your business, then product photography might be the thing. Not only for beginners, the speculation on how to do a proper product photography studio setup is a headache for professional and established photographers also.  

In this article, we’ll be showing you how you can do a proper product photography setup and  

  • Engage
  • Convert
  • Boost the lifetime value of your customers.

We will also focus on a few product photography tips that will save you time and money.

Ideas presented in images are easier to comprehend and to recall than words.

Kliegl, R., Smith, J., Heckhausen, J. & Baltes, P.B. (1987)

So product images can express more information than the product detail on your product page layout. This eases the decision-making process of a consumer and increases the conversion rates. To make the most of your first impression, it is important to present polished professional product images that evoke maximum commitment. In a purchase decision, 93% of consumers see the visual appearance as the decisive factor

1. Quality Visual Enhances The Consumers Buying Intentions

Quality visuals are the key ingredients for deciding to buy. Over 90% of consumers consider graphical content more appealing to buy any product. Your images show the perceived value and quality of your company. You speak to your target audience and make your product and service easier to understand.   

Why Amazon sells better than other eCommerce stores? If you see Amazon product page layout and read their image guidelines for product listing on Amazon, you will get your answer right away.

Quality-Visual-Enhances-The-Consumers-Buying-Intentions

Their product page layout is neat and clean. They have product images between 6-10 per product which is considered perfect for product presentation on the eCommerce store.

2. Product Image For Branding

Whether your company is small or big, making it a brand should be the only focus. Premium quality product images can play a vital role in making your company a brand. Images should contain all whether it is quality, subject, color, and saturation. It should speak like a uniform voice resonating with your target audience. 

From your website’s product image to any social post and your all marketing efforts for branding, images are the center of it. The goal is to build long-term relationships with your customers and product images are one of the most effective elements for this.

Product photography type?

There are two types of product photography is available for online stores and product marketing.

1. White background product image

This kind of image features your product on a white background. White background product photography is also known as packshot photography. It enhances the ratio of the visibility of your product image in the frame. You can put your raw product image into a white background by using photoshop.

The above image is from Nike’s official website. As we can see it is on a white background and it is also called packshot photography.

2. Contextual Product Photography

Contextual product photography gives an idea of the real-life usability of the product. Combining packshot product photography and lifestyle shots, consumers get the real experience of shopping.

By seeing the above product image from REI, if we want to buy the product we can easily imagine how my product will act in real life.

White background product photos showcase the product from all possible angles in its best light. These are usually taken on a white background so that the product line can be clear. But, Lifestyle shots, tell a story, and suitable for your conversion funnel..

Best Product Photography Studio Setup

For effective and effortless product photography, a well-managed photography studio setup is a must. The first shot of your product may seem overwhelming for the new photographers. After a few shots, every move becomes more normal and you will not even have to think about it. Finding the best studio setup that matches your photography is the key to everything. There are some basic types of product photography equipment that need to be in your kit list. Let’s get into our DIY product photography setup and know the rest.

  1. Setting up Backgrounds Right
  1. Product Photography Lighting Setup
  2. Product Photography Equipment
  3. Product Photo Post Processing

Setting Up Background Right

The background is always important in an image as a perfect background complements the subject. It enhances the image viewing experience. It is worthwhile to get the right background because it simplifies the editing process. For product photography, product photo on a white background is what you need to work for. You can Shoot your product on a white background in many ways but not all of them are cost-effective. 

There are two ways to achieve a white backdrop for your product photo. The first one is, you can shoot your product on a white background. The second one is, you can capture your product on any background and using the clipping path technique you can remove the background in Photoshop. We will talk about the second one in the latter portion of this article. 

In this part, we will talk about the setup for capturing your product on a white background. To create a white background set at a low cost you can follow two methods.

  1. Create A Table For Shooting.
  2. Create A Light Tent..

Create A Table For Shooting / Tabletop Product Photography

In a clothing photography setup using professional PhotoBench or automated product photography setup is very expensive but you can create a PhotoBench with a white background on your own. The easiest way is to move a chair against a wall and tap craft paper or white cloth on the wall to enable the wall to sink to the floor, creating an elegant transition from the vertical to the horizontal plane.

Create-A-Table-For-Shooting--Tabletop-Product-Photography--Flat-Lay-Photography

Image Source: Just a Girl Blog

You can even clip the paper to the top of the chair and improvise a stand like the photo above. 

For clothing product, you can go for the flat lay product photography. Here you can just lay a white paper or cloth and on top of that just lay your product. Then adjust the lighting according to your needs and shoot.

Cloth Flat lay-photography

Create A Light Tent/ Photo Light Box

If you need a clothing photography lighting setup, you can create a light tent or photo lightbox. It is shaped like a box with white walls and sometimes the lights are also integrated. It is also known as the photo lightbox and it can be found in online stores but those are expensive. To create a light tent or photo lightbox 

  1. Just manage a box-shaped object and some white paper or clothes.
  2. Stick the papers or clothes to make the walls white.
  3. If you want a light you can also attach that with your photo box.

You will get something like the above image where you can keep your small product and capture it with a white background. If you have a large product then you need to create a larger version of that.

Product Photography Lighting Setup

You may have the best product photography kit but without proper product photography lighting and management of that photography lighting kit, you won’t get attractive product photos. If there is a decisive factor that determines your product image consistency, it is the lighting. Setting up the studio light for a product photo is a tiresome job but if you can do it right, you will get an attractive product image. Good light eases your post-processing work.

In product photography lighting setup you will have two options for lighting.

  1. Natural Lighting
  2. Studio Lighting

Natural Lighting For Product photography

Natural lighting is the cheapest way to get your photography lighting done. If you have access to a large source of lighting naturally then you are very lucky. 

The things you need to notice to get the best natural lighting

  1. Bigger window for the brighter light source.
  2. Suitable space around the system for shifting and changing.
  3. Time, it will only work if you are able to shoot your products during the day.

As it is a natural light, you can’t control it and you won’t get the light you needed all day long. There is a particular time when you will get the perfect light for photography. It is called the golden hour for photography.

Morning Light: The light you get at this time is a bit warmer which produces a soft image.

Noon Light: In this time of the day, the light is harsh and creates a bluish shade on the image. 

Afternoon Light: Like morning, afternoon produces the same kind of warm light and photographers call it the golden hour.

Natural-Lighting-photography

Working with natural light is not an easy task as you can’t control it. So you should do some practice at different times of the day in different lighting. It will help you to not only understand the perfect time for lighting but also help you to understand from where and which angle you can capture your product.

After selecting the time and angle you can create a table for product photography or use flat lay product photography like we mentioned earlier.

Studio Lighting/Artificial Lighting

If you don’t have the access to natural lighting then studio lighting or artificial lighting is the only way. For studio lighting, you will need at least two softbox light settings to correct the shadows. One light should act as your key light and the other, depending upon your desired results, as your fill light or light backlight. Consider putting a white paper or a cloth on them to spread light and help to make the shadows sweeter.

You will put the main light in front of the product somewhat on your side while your fill or backlight is on the opposite side, back or up. Manipulate the angles and the intensity of the light until the shadows are gentle and even. You can also use white plaster or carton to defuse some of the glare and to soften the shadows further.

Studio lights allow you to manipulate the whole process more, particularly if you shoot multiple products over several hours. Once you installed the setup correctly, you will get clear professional results for all your shooting.

Product Photography Equipment

Apart from setting up your background and lighting, you will need a tripod and a camera with necessary lenses.

Tripod for product photography setup

You can shoot your product by your bare hand but you will lose consistency and sometimes framing. If you try to focus your entire product while keeping your camera in one hand without moving, it’s easy to get blurry pictures. The only solution to this is by using a tripod. Tripod ensures consistency, stability, framing, and focus. 

A good product image is an all-in-one great selling tool. Therefore, so many manufacturers of all products are eager to show future customers with the best pictures of their products. Either online on its own website or on a platform such as Amazon or eBay or to print flyers and catalogs, a manufacturer always needs a high-quality product picture.

The best tripod for product photography is really hard to find as there is a huge competition between companies who produce product photography equipment. We will suggest “ZOMEI Camera Tripod” for product photography. You can also use it outside the studio.

The horizontal central column is one of the main features of this tripod. The column can be pulled out to a position that permits it to travel horizontally. You can place your camera directly above the product with a horizontal central column. It can also be used to take flat art images. Some other important functions are the reversibility of the middle board. It gives you more options for positioning the camera. Returning the central column also allows for very lightweight folding of the tripod for transport and storage.

Camera product photography setup​

The camera is the key to any photography. So choosing the right camera is a must thing to do. But what is the best camera for product photography? You will find a lot of big companies in this sector. At first, DSLR was very expensive but the scenario has changed now. The prices of the DSLR has dropped significantly over recent years.

Before buying a new camera for photography keep two things in your mind

  • Manual exposure
  • Aperture settings

If you want to buy a camera in a mid-budget then my vote will go to “Canon EOS Rebel T7i/Canon EOS 700D”. Equipped with the right product photography lens this camera can offer you amazing product photos.

Nevertheless, if you have a smartphone, when you get started you do not have to think about investing in a camera. The technology for smartphone cameras has taken a long way and sometimes you take much better pictures than a professional camera would take. As long as your context and lighting are right, your setup can be perfect for your iPhone or Samsung. Sometimes you might want a smartphone or tripod, to help reduce blur and improve post-processing.

Product Photo Post Processing

Retouching images from a white background can be a difficult task, particularly if you haven’t had training. The impact of your images will truly be ruined if you do not do this last phase properly. Don’t waste the hard work that you have done on your pictures so far by making an awful job of editing. 

So no matter how perfect your product photo is, without post-processing you can’t present it in front of your consumer. The reason behind it is raw images often catches dust, scratches, blemishes, lighting issues, etc… Only image editing can remove these issues and make them attractive.

Image-Post-Production

In product photo editing there are many types of editing techniques that we use. Background removal by cutting out product images from the background using the clipping path technique is one of the most used image editing services in product photo post-processing. Even if you use your smartphone to shoot your products, the gap between mediocre and professional results can be reduced by image editing.            

For anyone seeking outsourced image-editing service, Clipping Path Service (CPS) is a great option. We provide uploading and handling your product photo editing jobs from start to finish. You get free photos for a free trial to make sure you’re happy with our work.

Take all the product photography tips and advice from this article, add them to your fantastic products and take beautiful pictures of the product! Sometimes it may feel like a lot of effort, but honestly, it’s worth getting the perfect photo! Having mastered the steps above, it is time to become innovative!

Navaho Mizsey

Navaho Mizsey

Author

“Navaho Mizsey is a Content Writer Executive with 5+ years of experience. He is a hardworking and talented writer. He writes what the audience wants to read. He completed his degree in journalism and started his career in content writing. He loves to write about photography, camera, and photographer”

One Comment

Zubida Khatoon
December 31, 2020 5:06 am

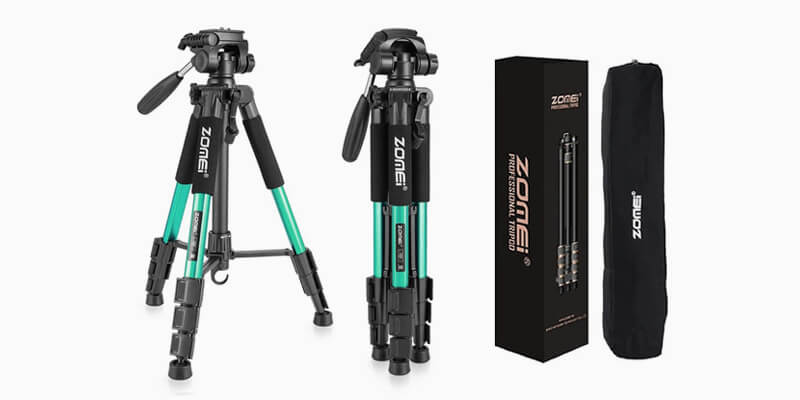
Sounds great. To me, a tripod is must-have gear for shooting.
A lot of photographers like to work without a tripod since it makes you fixed in place and also it’s hard to move around. I am now started to use it as a document first started and I need it. No doubt that it is really helpful if you want to capture in low light circumstances where you ought to use a slower shutter accelerate. By holding a camera accessible you’re gambling an outstanding blurry picture.

Leave a Reply

Quick Response

Email:
cs@theclippingpathservice.com

Hotline Support:
Mobile:       +1 (718) 717-2362