How to Edit Product Photos Using Photoshop
Editing product photos in a perfect way will increase your brand reputation and profit, but if you get your product photo editing slightly wrong, it can be a disaster for your brand. To build a brand, takes a lot of effort, investment, and dedication.
And the product represents your brand’s validation to the consumers so before publishing any product photo, it should be in 100% flawless state.
This editorial will see how to edit product photos flawlessly to publish them for both online and offline marketing. We will talk about editing product photos in photoshop.
You don’t need to learn photoshop for your product photo editing if you don’t know already.
Table of Contents
ToggleEditing Services Require for Product Photo Editing
For eCommerce product photo editing, there are a couple of editing services that you must do for your product photo as a retailer. Product photos need to look clean and impressive all the time to impress customers.
It is an open secret that using correct photography lighting and editing can bring significant product photo results.
Sometimes you capture your products so perfectly that you feel not to use any post-processing, but when you are going to upload those photos to your eCommerce store, then image post-processing becomes the only choice for you. Why?
Ecommerce platforms have their product image guidelines, and to get the best result retailers must follow them strictly.
So, as you see, you can’t use your raw product photos no matter how good they are, and they will become amazingly awful.
Suppose you carefully follow the online store’s image requirements. In that case, you will notice a couple of things such as a solid white background, highlighted product, accurate shadow, and perfect texture retouching.
Let’s know how to edit product photos…
N.B: I will also cover image requirements for eCommerce stores in this article, so stay until the end.
Guide to Edit Product Photos
Before going into the image editing stuff, I want to suggest you shoot your product in RAW mode instead of JPEG. Raw photos capture every detail possible by the camera, and you get more control over your image editing in photoshop cc.
The most common and must do image editing services for product photos are background removing, photo retouching, color correction, and shadow creation.
Matching with consumers’ expectations is not an easy task as we have billions of people, and everyone has different taste and feel.
But to make an image that can attract consumers right away requires professional photo editing. Let’s see our today’s step by step guide for professional image editing services for products.
How to Remove Background from Photo
Product photos in online stores have a solid background all the time, and most of them are white. The reason behind it is a solid background; the focus goes right into the product.
Not only that, a photo with a white background creates a minimalistic look to the image, and it looks amazing on web pages.
As a retailer, it is your duty to provide your consumer with a clean viewing experience whenever they visit your online stores.
But most beginners don’t understand that and upload product photos with backgrounds full of distractions.
That’s why eCommerce platforms like Amazon, eBay, Flipkart, Walmart, and others have introduced image guidelines for their retailers where they demand solid white background product photos only.
So how to get a white background product photo?
You may think that using a white background while photo shooting the products will do the trick, but you are wrong!
Yes, you must use a white background or any other contrasting solid background while shooting your product, but it wouldn’t be a wise decision to use them directly in your store.
You must cut the subject from the image and create a white background in photoshop. Then why should you use a white background in shooting?
Using a white background or any other solid background contrasting to your product in shooting makes the product more visible to the editor’s eye.
You can select and cut down the image background in photoshop with some simple steps and photoshop tools.
Removing image backgrounds have two major processes: selecting the background and deleting it or changing it.
Selecting the background in photoshop
To select an image background, there are a couple of photoshop tools that you can use.
- Quick Selection Tool
- Object Selection Tool
- Select & Mask Tool
- Pen Tool
You can select your subject or the background using these tools in adobe photoshop cc.
The selection process is slightly different for each of the tools, and if I start writing all of them, the article will be long enough to bore you. So for this editorial, I will use an object selection tool to select my product.
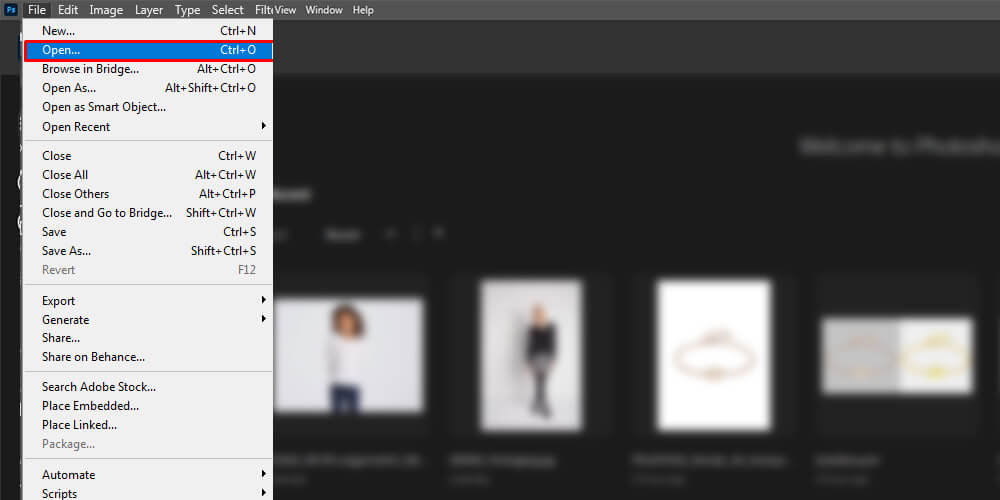
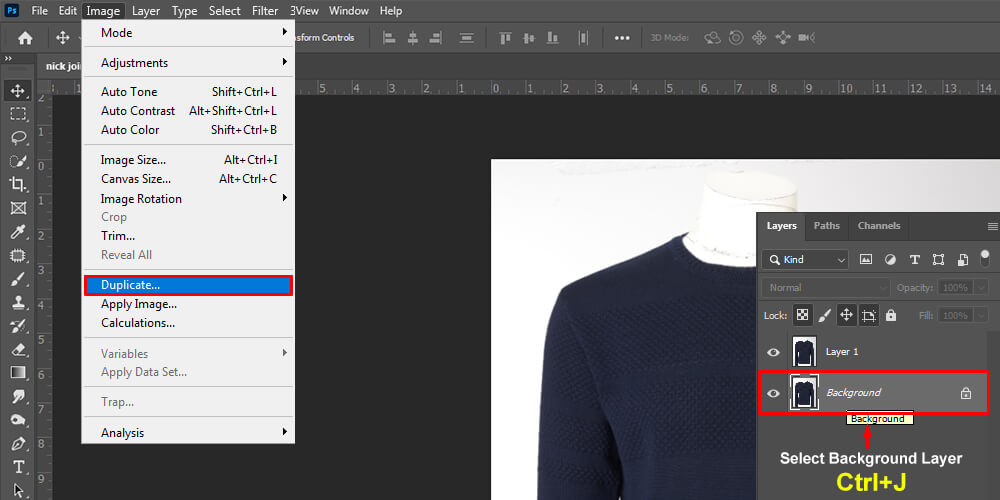
Step 1: Open your image in photoshop and create a duplicate layer.
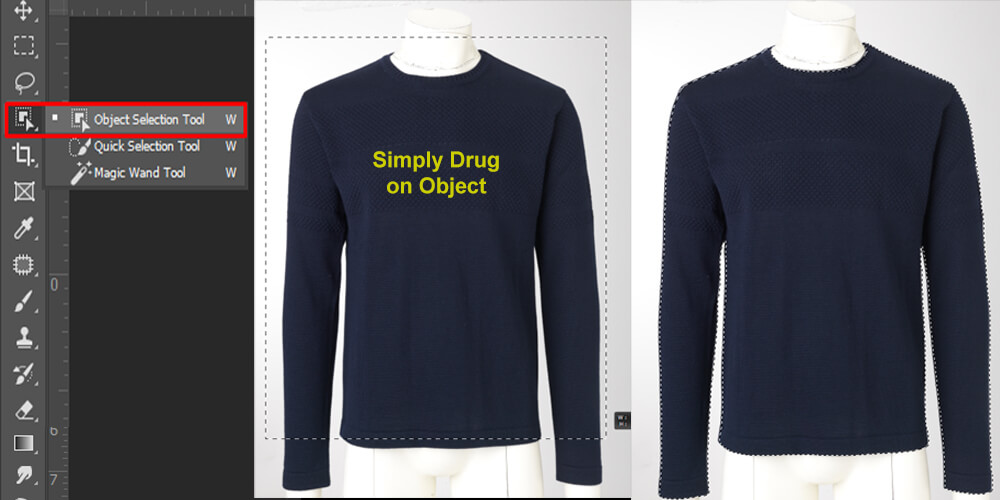
Step 2: Select the layer and go to the toolbar to select the Object Selection Tool. Select the tool and create a box around your subject by dragging the cursor over it. Your subject will be selected automatically.
Removing the Background
The selection process is over. Now we will remove the background and change it into a solid white backdrop.
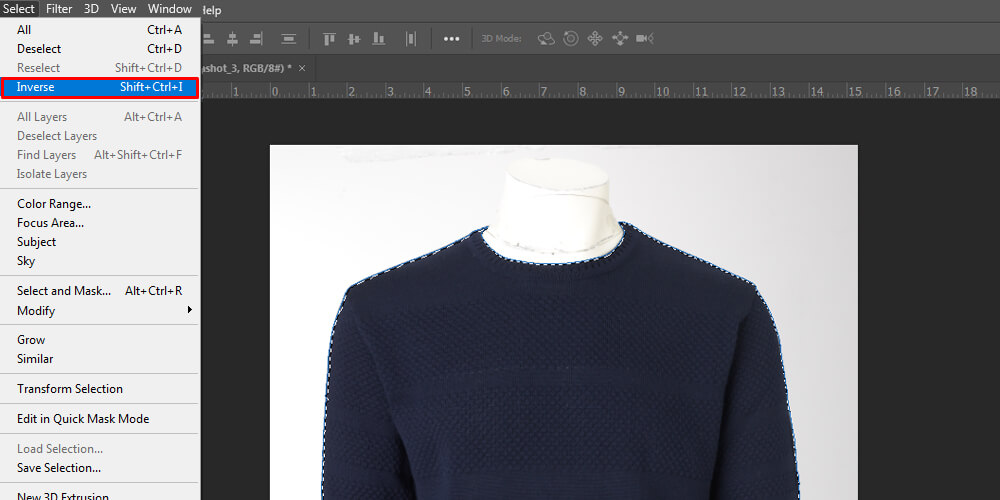
Step 3: After the selection process, we will get our subject selected, but we need to select the background. So we need to invert the selection.
To invert the selection, select the layer from the Layer Panel.
Step 4: Go to Select→ Inverse or click Shift+Ctrl+I, and the selection will be inverted. Now click on the Delete button and the background will be deleted.
Removing Spots From Product Photo
Getting dust and spots in images are expected. You can control lighting, posing and many other technical issues using professional photography setup, but you will never be able to prevent small things like dust and spots.
Photo retouching is the only way to fix these professionally and make the photos usable to the audience.
With high end photo retouching your product photo can work like a spell to its consumer and they won’t resist buying it.
Products that are too much reflecting or too much attention grabber with their glossy look must undergo image retouching service. Let’s see how we can remove spots from an image.
How to Remove Spots in Photoshop
You can remove spots and blemishes from an image using photo editing tools. In the latest Adobe Photoshop cc version, we will see five such tools that can remove dust from your image.
- Content-Aware Fill
- Clone Stamp Tool
- Spot Healing Brush Tool
- Healing Brush Tool
- Patch Tool
For today’s spot removing tutorial, I will use the Clone Stamp Tool. The Content-Aware Fill is the latest addition of photoshop cc. I will write an in-depth article on photoshop tutorial for this tool later but for today let’s see how we can remove spots using the clone stamp tool in photoshop.
Step 1: Create a duplicate layer and select the Clone Stamp Tool from the left toolbar with a soft brush.
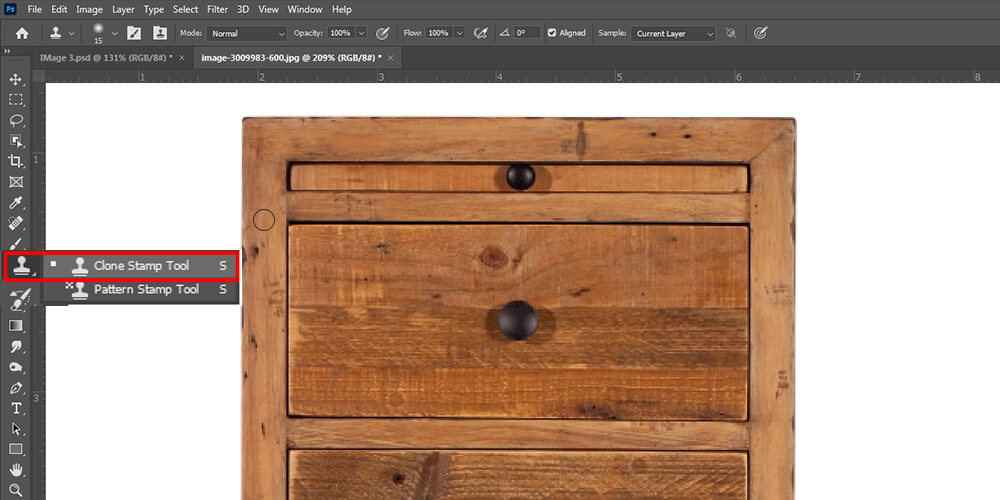
N.B: How does the clone stamp tool in photoshop work? Well, you will select the area you want to replace with the spot and brush over the spot area to remove it.
Step 2: Click on the area you want to clone and then brush over the spot. Boom!! The spot will be gone. Repeat the process for every spot you want to remove.
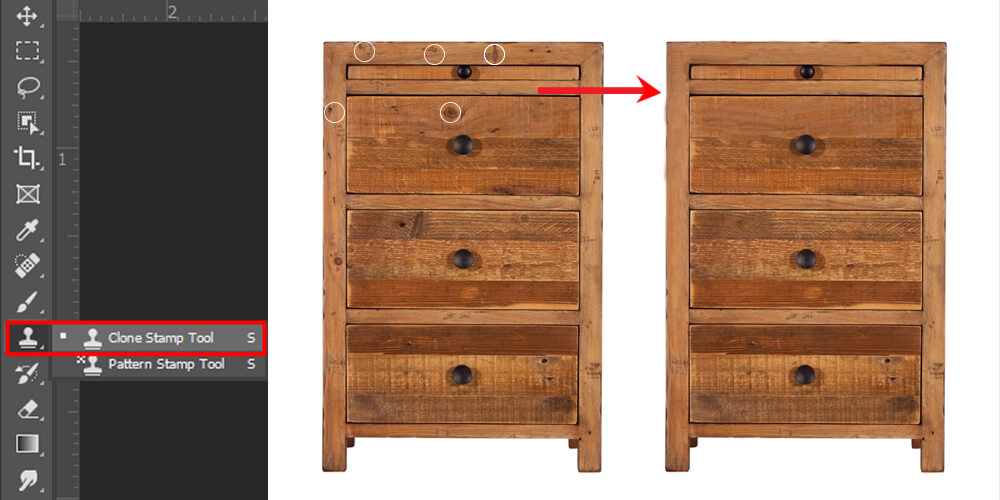
Products can catch dust and spots anytime while photoshopping them and you can’t ignore them also. You better use professional help for image retouching service.
Change Color for Different Version of Products
Color correction proves to be not only a money-saving photo editing service but also a time saving as well. Products have different versions of the same product but with different colors and features, such as smartphones like the latest iPhone 12.
Smartphones, apparel products, jewelry products have multiple versions, and you can’t shoot every one of them where changing color in photoshop comes into play.
You can change the color in Hue and Saturation settings in photoshop. The steps are given below.
Step 1: In photoshop to change a product’s color using hue and saturation, you need first to select the portion you want to change. You can choose a specific area using a pen tool in photoshop. Let’s think we have a portion selected for a photo.
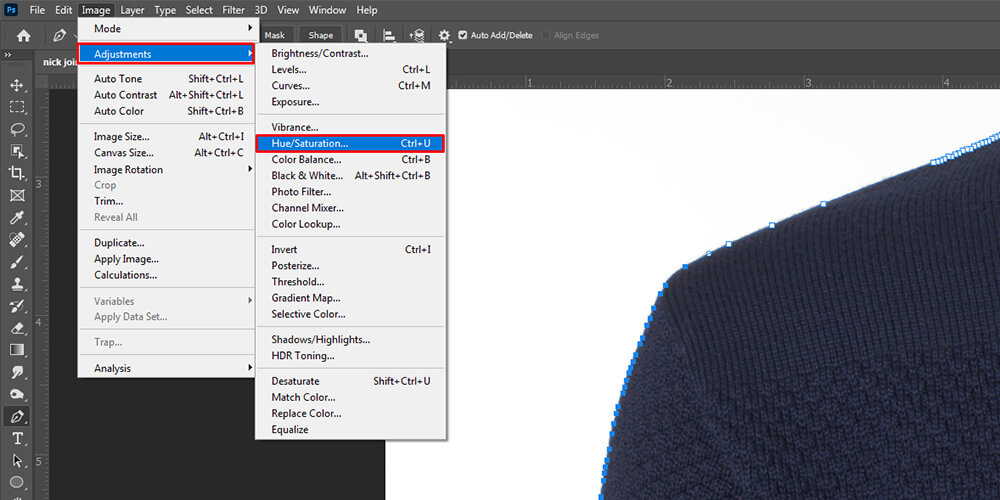
Step 2: Now go to Image → Adjustments→ Hue & Saturation or press Ctrl+U as a shortcut to select the option. A window with two sliders will appear.
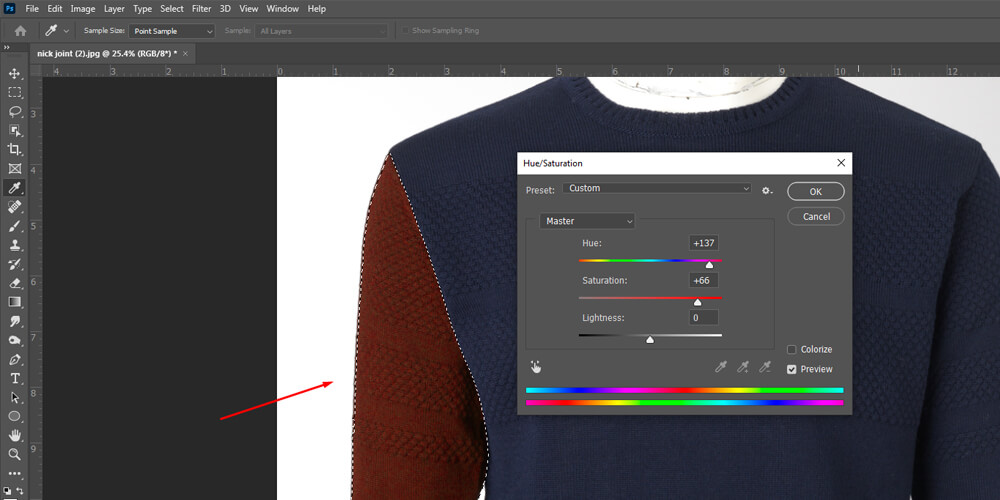
From there just change the numbers by sliding along the bar, and the color will change automatically. Stop when you get the desired color.
Shadow Creation on Product Photos
Online stores are becoming a 1st choice for buying anything from groceries to stylish products. Considering the global pandemic, our typical shopping got some revolutionary changes as well.
People are accepting the new normal, and that helps to boost today’s eCommerce platform.
So there are no shortcuts to sell your products online without providing trustworthy product photos and attractive descriptions but only the truth.
Shadow brings out the depth of your image, and without shadow in a product photo, the product will look like it is floating and unreal.
If you are searching for a combination of image editing for your product photo then with adding shadow, this will be a perfect package.
By popping your product photo and making it look grounded, the shadow completed the validation process.
Keep the natural shadow if you can and if the shadow is harsh, then desaturate it a bit by creating another layer for the shadow creation process. See the below image, and you will see the difference.
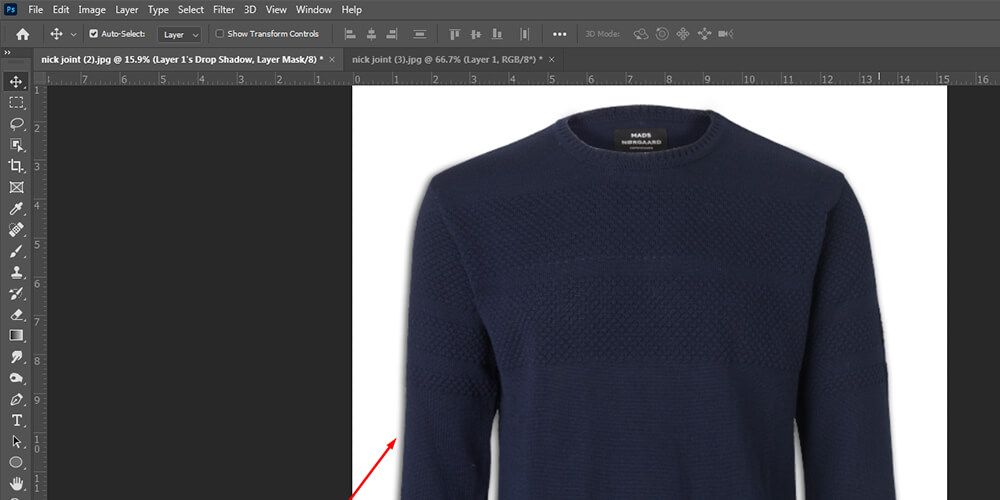
And with this, we are done with editing a product photo perfectly. The product image is ready to use but to upload it on online stores you have to do a couple of extra things that are more than manageable.
It doesn’t matter on which eCommerce platform you are going to upload there are a couple of things that are the same for all as I mentioned at the beginning.
Apart from those, the one thing you must carefully follow is your image’s size because different platforms accept different sizes and formats of product photos. Read the image guidelines carefully and follow them accordingly.
It doesn’t matter whether you are a professional or a beginner online retailer knowing how to edit product photos correctly can change your business profit altogether.

Bordie Capron
Author
“Bordie Capron is a Sr. Content Maker who is working in The Clipping Path Service an US-based image and video post-production company for over 7+ years. She completed her degree in graphic designing and worked as a graphic designing expert for several years. She always loved writing”
Categories
- Image Guidelines (12)
- Post Production (8)
- Pre Production (27)
- Review (16)
- Tips (51)
- Tutorial (18)
Recent Posts
Quick Response
Email:
cs@theclippingpathservice.com
Hotline Support:
Mobile: +1 (718) 717-2362


No Comments